Showing posts with label protective style. Show all posts

Wednesday, June 26, 2013

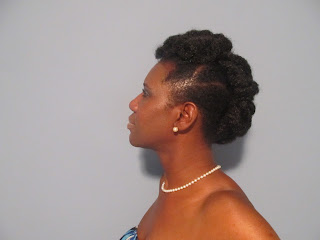
Marley Hair Faux Hawk Updo - Protective Style


I posted the above picture on Instagram last week.  I was at my godsister's high school graduation and it was extremely hot that day.  I knew if I wore a loose hairstyle, the heat & humidity would cause it to swell, poof, & frizz on a special day where I wanted my hair to be a little more predictable finishing than documenting.  LOL!  The tip that I will give you is to watch the beginning where daneteb shows how she tucks & pins her hair and focus on the technique not necessarily the exact placement of her Marley hair.  I knew I had to wear an updo.  I searched Youtube to find a tutorial and found the one below.  It was my intention to recreate the style and do a step by step tutorial but between time & effort to create the style, I became more focused on finishing the style.


Here are some other shots of the style.  I used a pack and a half of Marley hair to create this style and I wore it for a week.


I loved it so much that I think I'll recreate this again for another event that I'm going to later this summer! Let me know what you think of my version of the style?  Is it pretty close?  


Wednesday, March 20, 2013

Natural Hair Protective Style: Buns!


As is usually the case during this time of year, I wanted to give myself a break from styling my hair daily.  I typically  get a braided updo style but with my increasing length, I decided to try styling my hair in a series of buns!  I wore the following 3 buns over the course of 3 weeks. I loved the break, my hair stayed moisturized and protected, and I looked very chic with each style!  I can see me returning to buns for a quick style alternative throughout my hair journey.

Prep

Before setting each bun, I shampooed my hair, deep conditioned, & applied my leave in.  I then sealed the moisture with coconut oil & applied a moisturizer.  I smoothed my hair back with Koils by Nature Herbal Gel for each style.  I pulled my hair into a ponytail and 2 strand twisted the loose hair into 4 twists & then rolled and bobbypinned the ends down.

Bun #1  - Marley Hair Bun


I used Marley hair to achieve this bun.  I received my inspiration for this style from Jouelzy from Youtube's Empress Bun.  Her's is larger than mine but I followed the same concept. 

Bun #2 - Low Side Bun with Side Part


For the next week, I decided to change it up and create a low side bun.  This time instead of using Marley hair, I used regular braiding hair and bobby pinned it around my ponytail.

Bun # 3 - Bun with Center Part


First of all do you see those waves?!  LOL!  I used the same braiding hair for this bun as well.

Maintenance

I tied my hair down each night with a satin scarf.  In the morning, I would rub coconut oil over my hair for sheen.  If my edges needed to be slicked mid week I would add the Curls Paste to smooth them down.  

I loved these options!  What is your favorite protective style?

Friday, February 22, 2013

Easy Protective Hair Style - Classic French Roll


Ever had a late night and when you get home twisting up your hair is the last thing you feel like doing?  Well that is usually me the night before wash day.  Last week, I had worn my hair in the twist and curl style for 3 days and then I wore a textured bun for 2 days.  My hair was very stretched.  My stretched hair made it very easy to manipulate into this french roll.  I misted my hair with water and added my Qhemet Biologics moisturizer, Burdock Root Butter Cream.  I rolled and pinned the back going up towards the crown of my head.  Then I took the bang area and rolled and pinned it back into a pompadour. To make sure my sides were smooth, I used the Curls Passion Fruit Control Paste and smoothed with a soft bristled brush.  I then tied my hair down for about 20 mins with a scarf to set the pomade and lie down any flyaways.

This style is a great go to when you need a sleek, chick style that's quick and you have stretched hair.  That's what I call a win, win!


What is your go to protective style?

Teaser:  Check back later today around noon to see my announcement about an exciting Natural Hair Expo & Hairshow coming to the Triad area of NC this summer!

Wednesday, February 20, 2013

Wig Review (Protective Styling Option): Beshe LW Mini


I recently purchased another wig.! I just love having the option of changing up my look and I promise you these wigs come in handy when you have to run out of the house really quickly, when you don't have time to do your hair and it isn't styled, or when you just need a break from doing your hair.

Let me share a little bit with you about this piece.  This is a lace front wig by Beshe.  What I'm learning about Beshe wigs as this is my 2nd one is that Beshe creates very FULL wigs.  If you do not like big hair, a Beshe wig is not for you.  If you like rocking your hair big & full then you will love a Beshe piece.

Type of Wig:  Synthetic Lace Front
Purchased From:  HairWigHarlem
Price: $24.49
Shipping:  Fast, I ordered on a Tuesday & received on Friday (3 stars!)
Hair texture: Very soft, loose curls
Combs?  Yes, 2 on the side & 1 in back
Adjustable strap?  Yes
Parting room?  Less than an inch
Lace blends well

My impression:  I love this wig.  I had to get used to the fullness at first but that took no time.  It fit snuggly on my head and the curls are soo soft and romantic looking.  Because of the natural hairline and the way the lace blends, I can pull back few strands to give it a carefree style and still have a very natural look. I will definitely be wearing this wig for some time.

"My" Hair:  To prep my hair for wearing this wig, I moisturized with Qhemet Biologics Burdock Root Butter Cream & smoothed my hair back into a low bun.  I placed a wig cap on top of my hair before placing the wig.  This is of course a protective style because my hair & ends are fully covered and protected.


To see my other wig reviews click the links below:

Drew by Beshe

Miss Kiki by Masterpiece

Have you ever used wigs to protect your natural hair?  Which wig is your favorite?  

Teaser:  There is an exciting natural hair expo & hair show coming to the Triad area of NC this summer.  I will giving you all the deets during my Friday post! 

Wednesday, January 16, 2013

A Wig Review: Protective Styling Option


 Don't be alarmed!  I did not straighten my hair.  LOL!  In fact you would be surprised to know what is going on under that wig.  "My" hair has deep conditioner in it and I'm going to let it stay in overnight.  I also had a December graduation reception to attend.  Sooo, I donned this wig and no one was the wiser.

Why wear a wig you ask?  Well, now that my hair is longer, it takes long for me to complete my cleansing and conditioning regimen and style.  I've been caught more than once needing to get somewhere quick and my hair wasn't finished. So for those days, I purchased this wig.  It's also great for those times when I've just finished setting twists and I want to leave them in for a day before unraveling.


I purchased this at my local beauty supply store.  It is a 100% human hair wig by Masterpiece in #1B.  Her name is Miss Kiki.  I paid $32.99 for her.  This wig also allows me to wear the straight look without applying heat to my strands.  I love it.  There is minimal shedding and no tangling.  It fits comfortably on my average side head.  There are no combs on this wig but it does have an adjustable band.  I still have a couple more wigs to order so I can have some fun playing with my look.


So tell me, what do you think?

Wednesday, December 19, 2012

NaturallyNita's Take on MsVaughnTV's Fall Protective Style


Recently MsVaughnTV uploaded a simple fall protective style to her Youtube channel.  I saw this at just the right time because it was wash day and I needed to go out to an event and wanted to look presentable and didn't have time to shampoo, condition, and style my hair.  This style was created from the 3 in 1 Convertible Hairstyle that I just posted.  I didn't take pictures during each step but let me share what I did do.

1. Lightly misted my hair with water.  Remember that the back had EcoStyler gel in it.  Though it had softened up over the week, I wanted to make sure it was moisturized enough to manipulate.

2.  I applied the KeraCare Butter instead of Entwine's Products for added moisture.

3.  I used Taji's Aloe jelly on my flat twists & the twists in the bang area.

4.  To make my "roll" in the back a little fuller, I added a little bit of marley braiding hair in the middle for stuffing and bobby pinned my hair over it.

Check out my results below!


I really liked how this modification to the traditional roll, tuck, and pin turned out!  I still need to practice more on my flat twists but overall I like this style!  It's one that I will definitely try again.

Have you mastered the roll, tuck, & pin hairstyle?  What modifications have you made to make it work for you?

Wednesday, December 12, 2012

Protective Style - Large Senegalese Twists


For my summer protective style I went to Taji's and had Senegalese twists put in.  However, as this is a favorite summer style for a lot of women and  I like to be different, I had her make them jumbo twists. I loved this style but initially at this length, they were waaay too heavy for me. 

So she cut them for me and I wore this style and modifications to it for 8 weeks.


Here I am with Lisa Price of Carol's Daughter after they were cut.  Here is one of the style modifications that was done.


This was a great way to wear my hair this summer & is also a great fall/winter protective style.  All you have to do is moisturize your hair weekly with a mist.  You can keep your scalp clean between washings with witch hazel on a cotton ball.  At night, sleep with a satin bonnet.


Wednesday, May 2, 2012

Protective Style: Cornrowed Updo


So by now those of you who follow me know that about 2 weeks out of each month, I wear a protective style and for the other 2 weeks I wear my hair out.  It just gives me a break from styling my hair and my hair a break from being styled.  Well, in early April I went back to Taji's Natural Hair Styling for this protective style.  I loved the look!  I was able to maintain this style for 2.5 weeks!  I retwisted the bang section about once a week.  At night I would mist my hair with my moisturizing mist and then add oil.  I would tie a scarf around the back of my head and under the bangs, top with my satin bonnet and go to sleep.

Check out more pictures of the style below!


Wednesday, April 4, 2012

Natural Hair Protective Style: My Take on The TrendySocialite's Her Royal Flyness


After my success doing my first Marly hair protective style, I decided to try my hand at another. This one was inspired by Youtube's TrendySocialite's "Her Royal Flyness" protective style.

For this style you will need a rat tailed comb, a holding gel, 1 pack of Marley braiding hair, 2 small Ouchless ponytail holders, and hair pins.  This style was done on freshly shampooed, conditioned & detangled hair.  My leave in conditioner had already been applied and I had sealed with an oil.

Here is my pictorial tutorial:

 Step 1:  Part your hair from ear to ear.  Add holding gel to smooth your hair into 2 buns and then secure with Ouchless ponytail holders.


Step 2:  Take 1 pack of Marley hair split the hair in half.  Slide a rubber band to the middle of the length such that you have 2 equal halves on each side of the rubber band for each 1/2 bundle. Wrap1 bundle around the rubber band around your bottom bun. Wrap the other bundle around your top bun.  Group the "hair" strands together on each half and create 1 extra large two strand twist with the Marley hair.  Secure the end with a rubber band to keep from unraveling.


Step 3:  Wrap your Marley hair twist attached to your bottom bun up and around your top bun in a figure 8 fashion, pinning down in the top and sides with hair pins.


Step 4:  Wrap your Marley hair twist attached to the top bun downwards in a figure 8 fashion on the opposite side pinning under the bottom bun with hair pins.  Use extra hair pins to pin where needed until you feel the style is secure.

Maintenance:  Sleep in  satin bonnet at night.  For flyaways, mist with water and apply more holding gel smoothing with your hand or a soft bristled brush.

See the video inspiration below:


Have you ever done a protective style using Marley hair?  Did you create your own or get inspiration from somewhere else?  I'm always looking for new styles so please share in the comment section below!

Tuesday, January 31, 2012

Protective Natural Hair Style: Flat Twist Up Do


Though we're experiencing a milder than usual winter in NC (it's 66 degrees as I'm writing this) I still want to protect my hair.  In addition, I'm increasing the frequency of my workouts and I don't want my hair to be an excuse not to go to the gym.  So I visited Taji's Natural Hair Styling for another protective style.  I was able to wear this hair style for a total of 3 weeks.

For maintenance I just spritzed my hair a couple times a week with my moisturizing mist.  I would then seal in the moisture with a light oil, which would also add a little sheen.  I would also cover my hair at night with my satin bonnet.  That was it!  Simple & easy.

Check out the pictures below.


To achieve this look, Taji flat twisted the sides of my hair from the front to the back.  Then she two strand twisted the middle.  Afterwards, she pinned the twists in the middle to create this look.

During my 3rd week wearing this style, I took out the twists in the middle and created a different updo style.


Related Posts Plugin for WordPress, Blogger...