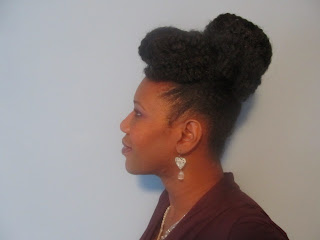
This weekend I had the opportunity to go to a meetup hosted by The TrendySocialite AKA Adeea Rogers in Greenville, NC (check out her channel on Youtube by clicking here). While there she showed us how to achieve 3 different looks with a protective style she's currently rocking. One of the looks she demonstrated incorporated the use of Marley braiding hair. I was in the process of looking for a protective style for this week so it was right on time.
The first look is my attempt at creating a recent hairstyle that Youtuber BlackOnyx77 posted . I wore this style to church this past Sunday.
Step 1. I gelled my hair up into a high bun & secured with a Goody ouchless band.
Step 2. Took 1 package of Marley Braiding hair and looped sections around my bun. (see video below for demonstration.)
Step 3. I took half of the braiding hair from each side and pulled it to the front a created a bang by stuffing a large ball of separate braiding hair (which I eventually made smaller b/c this bang was too large) underneath & wrapped the marley over top and around. Secure the bang with bobby pins.
Step 4: I was running late for church so I didn't get to take a picture. BUT take the loose hair and pull up vertically. Take another small ball of hair for stuffing and place in front at the top of the loose hair. Roll the loose hair forward covering the ball of stuffing to create a high bun. Secure with bobbypins.
Step 5. If you can see the circle in the back, portion of the bun, that is actually "my hair" bun that started the style. I pulled the Marley braiding hair up to cover my bun so it would blend.
Step 5. While this above style was regal & gorgeous, it added about 4 inches of height to my already 6'1 frame. To make it more manageable I removed the stuffing in the rear and wrapped the loose hair around "my" bun to create a bun flatter to my head. I wore this style to work on Tuesday. To preserve this style at night, I simply wrap a scarf around my head and under the front bang. I reposition/shape the bang in the morning, making sure any bobypins that moved that night are secured & go!
For those of you who are like me and are visual, here are videos showing how to recreate these styles.
This is the bun I used on the 2nd style. I may recreate this exact style using the below tutorial next week, just to change it up a little. I'm just trying to keep my hair protected from the cold weather & well as stay fly and cute doing it! Natural hair IS versatile!
NaturallyNita is a women's lifestyle blog. After chronicling her natural hair journey 2.5 years ago, Nita realized that there were many other life journeys where she could share her lesson's learned with others. This blog focuses not only on natural hair but also health/fitness, business, finances, spiritual & personal growth. www.naturallynita.blogspot.com


So pretty!
ReplyDeleteThank you!
ReplyDeleteWhat brand of marley braiding hair did you use. Also, I would like to achieve the first look that you had, with the braids hanging down but the instructions are not very clear. I also have had no success in looking at the various you-tube videos to demonstrate that particular look. (I LOVE IT!!) please help!!
ReplyDeleteHi, I'm glad you liked the style. I don't remember what brand of Marley braiding hair I bought but you can find Marley hair at any typical beauty supply store. If you want to recreate JUST the step one/two picture, please see the BlackOnyx video after she pulls the hair back in a bun she starts tying the Marley Hair at the 6:00 mark. Hope that helps!
DeleteGREAT!!! GOT IT!!! THANKS SO MUCH!!!
ReplyDelete